Terraform is one of those tools that once you try it, you’ll miss it when you don’t have it available. Instead of creating resources manually by clicking through consoles or running commands, you describe what you want in text files and Terraform takes care of creating it.
In this post, I’ll explain what it is, how to install it, and how to take your first steps with this essential tool for a DevOps engineer.
⚠️ DISCLAIMER: Please note that this article is a manual translation of the Spanish version. The screenshots may have been originally taken in Spanish, and some words/names may not match completely. If you find any errors, please report them to the author. ⚠️
What is Terraform?
Terraform is an open-source tool developed by HashiCorp that lets you define and provision infrastructure through code, known as Infrastructure as Code (IaC). Instead of dealing with human error, lack of documentation, and difficulty reproducing environments, with Terraform you describe your infrastructure in plain text files that can be versioned in Git just like any other code.
These files are declarative: you define the final state you want, and Terraform automatically calculates the actions needed to reach that state. You don’t need to specify intermediate steps, and if you run it multiple times, you’ll always get the same result (known as idempotency). Plus, before applying any changes, it shows you an execution plan so you can review what it’ll do. No surprises.
Some tasks Terraform makes easier are:
- Provisioning infrastructure: Creating servers, networks, databases, containers…
- Managing multiple providers: AWS, Azure, GCP, Docker, Kubernetes, and many more.
- Versioning your infrastructure: Your
.tffiles go to Git like any other code, with everything that entails (change review, history, collaboration…).
The workflow
When working with Terraform, you typically follow three steps: write the configuration, plan the changes, and apply them:
1. Write: You create .tf files that describe the resources you need:
# ...
resource "docker_container" "nginx" {
  name  = "my-nginx"
  image = "nginx:latest"
  ports {
    internal = 80
    external = 8080
  }
}
# ...
2. Plan: Terraform analyzes your configuration and shows what changes it’ll make, like a “dry run” that prevents surprises:
terraform plan
3. Apply: If the plan looks good, you apply it and Terraform creates, modifies, or destroys the resources needed so your infrastructure matches the configuration:
terraform apply
Basic concepts
Before starting, there are three concepts you need to understand:
-
Providers: These are plugins that let Terraform talk to the APIs of different services. There are providers for AWS, Azure, Google Cloud Platform, Docker, Kubernetes, GitHub, Cloudflare… and thousands more. For the practical example, we’ll use kreuzwerker/docker.
-
Resources: These are the infrastructure components you manage. Each resource is defined in a
resourceblock with its type and a local name. -
State: Terraform stores your infrastructure state in a
terraform.tfstatefile. This file maps what you’ve defined in your code to the real resources that exist.
⚠️ Important: The state file can contain sensitive data (passwords, tokens, IPs…). Never commit it to Git. Add
*.tfstate*to your.gitignore.If you work in a team, manage the state file through a remote backend (S3, Azure Blob Storage, etc.) which, besides centralizing access, supports state locking to prevent two people from modifying the infrastructure at the same time and corrupting the file.
Later, we’ll also see variables and outputs in the practical example.
Requirements
- (Optional) Docker installed to follow the first practical example. If you don’t have it yet, you can follow my Docker installation guide.
Installation
Note: If you’re not using Debian/Ubuntu, you can check the official documentation at Install Terraform | Terraform | HashiCorp Developer.
For Debian and Ubuntu, there’s an official HashiCorp repository that makes installation and future updates easy:
# Install dependencies
su -

apt update

apt install gnupg

# Add HashiCorp's GPG key
wget -O- https://apt.releases.hashicorp.com/gpg | \
  gpg --dearmor | \
  tee /usr/share/keyrings/hashicorp-archive-keyring.gpg > /dev/null

# Add the repository
echo "deb [arch=$(dpkg --print-architecture) signed-by=/usr/share/keyrings/hashicorp-archive-keyring.gpg] https://apt.releases.hashicorp.com $(grep -oP '(?<=UBUNTU_CODENAME=).*' /etc/os-release || lsb_release -cs) main" | \
  tee /etc/apt/sources.list.d/hashicorp.list

# Install Terraform
apt update

apt install terraform

# Exit the root session
exit
After installing Terraform, you can verify it’s ready to use by running:
terraform version
You should see something like:
Terraform v1.14.4
on linux_amd64
Simple practical example: A Docker container
We’ll create a simple project that will spin up an nginx container, so you can get a hands-on understanding of how it works.
First, create a directory for your project and navigate to it:
mkdir -p ~/terraform-demo

cd ~/terraform-demo
Create a main.tf file. I’m naming it this way by convention, but you can call it anything as long as it has the .tf extension. This file will be the core of the project where we’ll define the resources we want to create. You can also split the configuration into multiple .tf files to keep things organized, we’ll see that later:
nano -cl main.tf
Add the following content:
⚠️ Note: If you’re using Docker Rootless, make sure to change the socket path in the
provider "docker"block. In my case, the path would beunix:///run/user/1000/docker.sock. If you’re not sure what yours is, you can check it withecho unix://$XDG_RUNTIME_DIR/docker.sock.
terraform {
  required_providers {
    docker = {
      source  = "kreuzwerker/docker"
      version = "~> 3.6.2"
    }
  }
}

provider "docker" {
  host = "unix:///var/run/docker.sock"
}

resource "docker_image" "nginx" {
  name         = "nginx:alpine"
  keep_locally = false
}

resource "docker_container" "nginx" {
  name  = "nginx-terraform"
  image = docker_image.nginx.image_id

  ports {
    internal = 80
    external = 8080
  }
}
Let’s break down each block:
terraform {}: Declares the providers for the project. Here we specify that we’ll usekreuzwerker/dockerversion3.6.2or minor updates.provider "docker" {}: Configures the connection to Docker via its Unix socket.resource "docker_image" "nginx" {}: Defines the image we want to download (nginx:alpine). Withkeep_locally = false, we’re telling it not to keep the image if we destroy the setup.resource "docker_container" "nginx" {}: Creates the container from the previous image. We usedocker_image.nginx.image_idto reference the downloaded image ID and map port 80 from the container to port 8080 on the host.
Each provider has its own resource types and options. The type (docker_image or docker_container) determines what parameters you can use and how it behaves. Check the documentation of the one you’re using to see all the details.
In this example, I’m using kreuzwerker/docker, the most popular one for managing Docker with Terraform. You can consult its documentation here.
Regarding versions, Terraform has a constraint system that lets you specify which versions are compatible with your configuration. This is important to prevent an update from breaking your infrastructure:
| Operator | Example | Description |
|---|---|---|
= |
= 3.6.2 |
Exactly that version, can’t be combined with other operators |
!= |
!= 3.6.2 |
Any version except the specified one |
> |
> 3.0.0 |
Greater than the specified version, not including it |
>= |
>= 3.0.0 |
Greater than or equal to the specified version, including it |
< |
< 4.0.0 |
Less than the specified version, not including it |
<= |
<= 3.9.9 |
Less than or equal to the specified version, including it |
~> |
~> 3.6.2 |
Allows only the right-most version component to increment |
To clarify the ~> operator better:
| Constraint | Meaning | Accepts | Rejects |
|---|---|---|---|
~> 3.0 |
Version 3.x | 3.0, 3.1, 3.9.5 | 4.0, 2.9 |
~> 3.0.1 |
Version 3.0.x | 3.0.1, 3.0.2, 3.0.9 | 3.1.0, 4.0 |
~> 3.6.2 |
Version 3.6.x | 3.6.2, 3.6.3, 3.6.15 | 3.7.0, 4.0 |
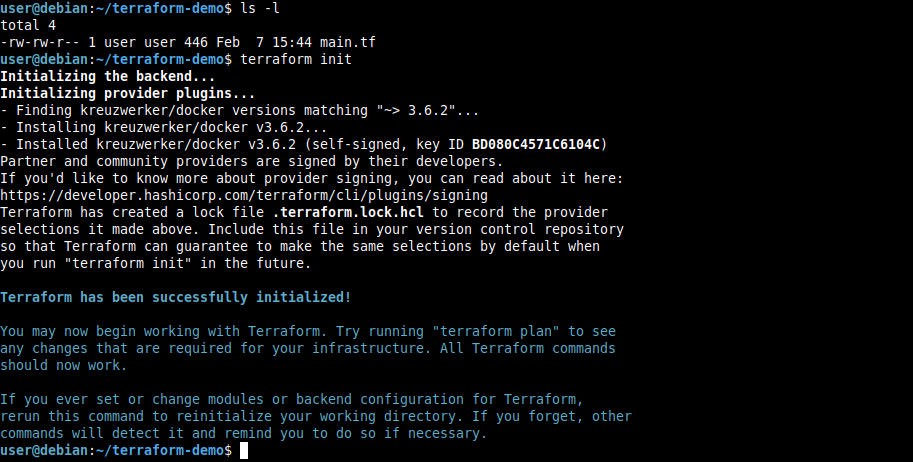
Initialize the project
terraform init
This command downloads the necessary providers and prepares the working directory. You only need to run it the first time or when you add a new provider.
View the plan
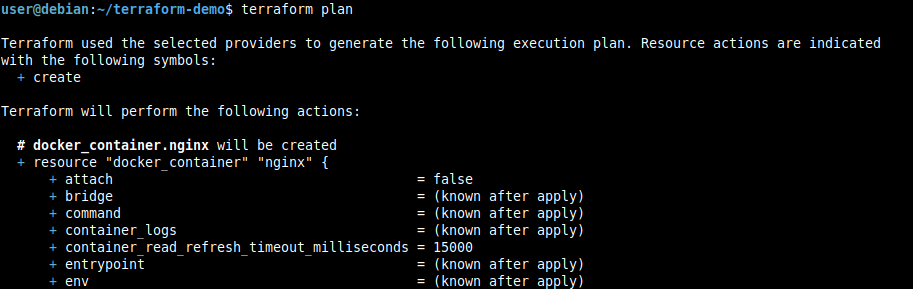
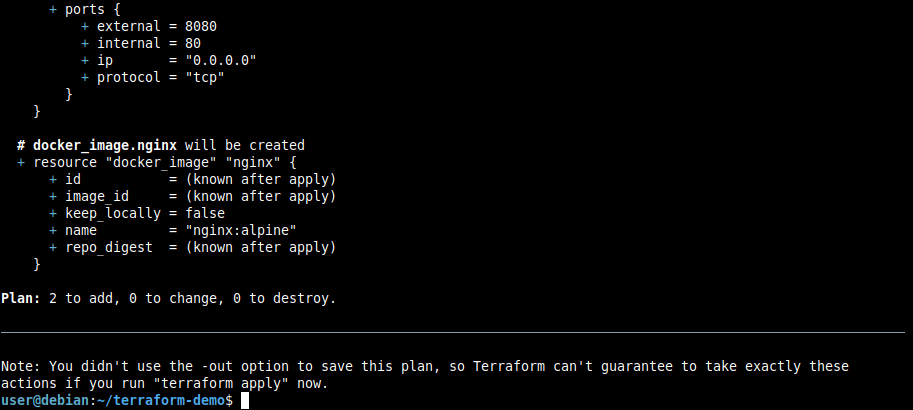
terraform plan
Terraform shows us what it’ll do to reach the desired state defined in main.tf. In this case, it’ll tell us it’s going to create an nginx image and a container:
Apply the configuration
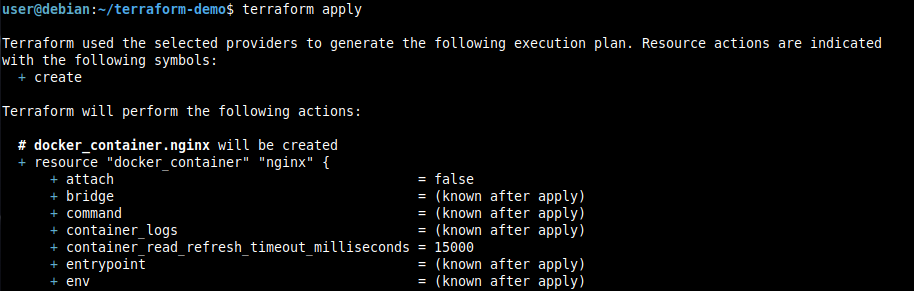
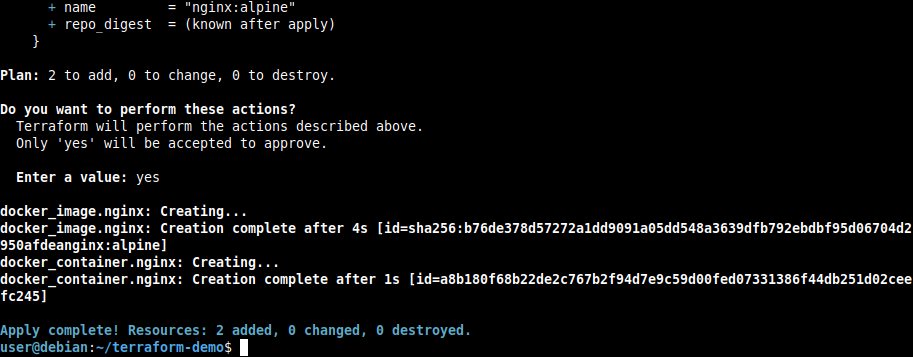
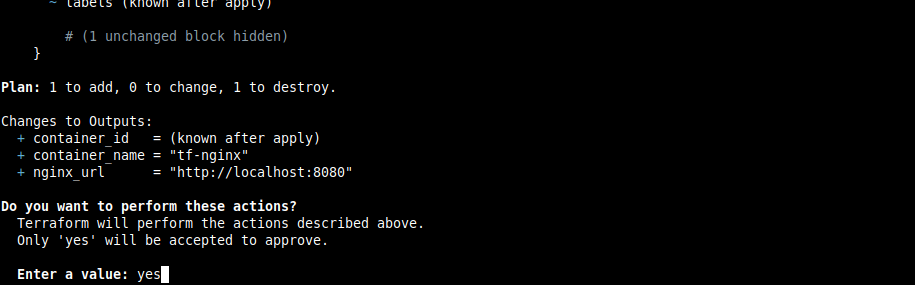
terraform apply
When you run apply, it’ll show the plan again and ask for confirmation. Only by typing yes will the changes be applied:
Verify the result
It’s great that Terraform says it applied the changes, but it doesn’t hurt to check ourselves:
# List the created container
docker ps --filter "name=nginx-terraform"

# Get nginx's default page
curl http://localhost:8080

We can see everything went well, the container is running, and nginx responds correctly.
If you want to see your infrastructure’s current state, you can use:
terraform state list

terraform show

Variables and outputs
Terraform offers variables (parameterizable input values) and outputs (values exposed after applying the configuration).
This is especially useful for more complex projects, but let’s add them to our example so you can see how they work:
Create a variables.tf file, which as its name indicates, will define the variables we’ll use in main.tf:
nano -cl variables.tf
Content:
variable "container_name" {
  description = "Name of the container"
  type        = string
  default     = "nginx-terraform"
}

variable "external_port" {
  description = "External port for nginx"
  type        = number
  default     = 8080
}

variable "docker_host" {
  description = "Path to the Docker socket"
  type        = string
  default     = "unix:///var/run/docker.sock"
}
Syntax of the variable block:
variable "name" {}: Defines a variable with a unique name in the project.description: Explains the purpose of the variable.type: Defines the expected data type (string, number, bool, list, set, map, or null).default: Specifies a default value. If no value is provided when applying the configuration, this will be used. If no default is defined, the variable becomes mandatory and Terraform will ask for a value when runningterraform apply.
Now, create an outputs.tf file where we’ll define the values we want to expose after applying the configuration:
nano -cl outputs.tf
Content:
output "container_id" {
  description = "ID of the container"
  value       = docker_container.nginx.id
}

output "container_name" {
  description = "Name of the container"
  value       = docker_container.nginx.name
}

output "nginx_url" {
  description = "URL to access nginx"
  value       = "http://localhost:${var.external_port}"
}
Syntax of the output block:
output "name" {}: Defines an output with a unique name in the project.description: Explains the purpose of the output.value: Specifies the value to be exposed. It can be any valid Terraform expression, including references to resources, variables, or other outputs.
Finally, we modify main.tf to use the variables instead of hardcoded values. To call variables, use the syntax var.variable_name:
nano -cl main.tf
New content:
terraform {
  required_providers {
    docker = {
      source  = "kreuzwerker/docker"
      version = "~> 3.6.2"
    }
  }
}

provider "docker" {
  host = var.docker_host
}

resource "docker_image" "nginx" {
  name         = "nginx:alpine"
  keep_locally = false
}

resource "docker_container" "nginx" {
  name  = var.container_name
  image = docker_image.nginx.image_id

  ports {
    internal = 80
    external = var.external_port
  }
}
Now when you run terraform apply, you have the option to use the default values defined in variables.tf or specify different ones:
# Use default values
terraform apply

# Use different values
terraform apply -var="container_name=tf-nginx" -var="docker_host=unix:///run/user/1000/docker.sock"
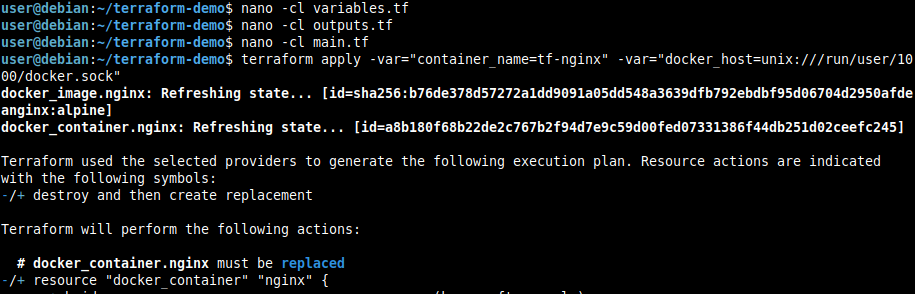


We can see the container name changed to tf-nginx but the external port is still 8080 because we didn’t specify a new value for that variable, so it used the default. If we wanted to change it, we could have added -var="external_port=9090" to the apply.
After applying the configuration, you can see the outputs defined in outputs.tf with:
terraform output

Modifying infrastructure
As we’ve already seen in the previous section, if you change the configuration, Terraform takes care of the rest.
For example, if we modify the external port in variables.tf:
sed -i 's/= 8080/= 9090/' variables.tf
If you run terraform plan, you’ll see Terraform detects the change and shows exactly what it would do if you ran terraform apply:
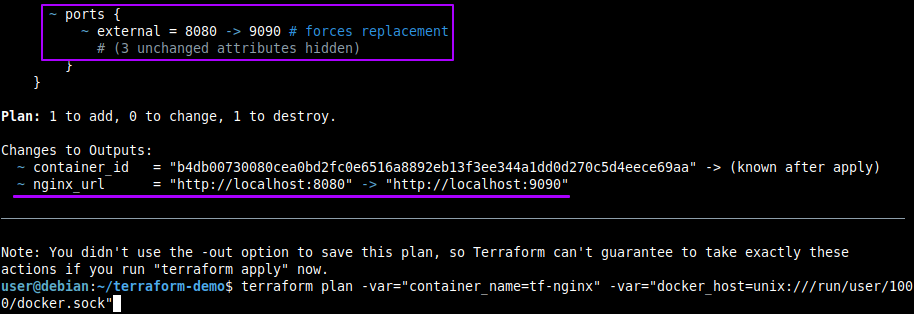
Don’t forget to add variables to your plan and apply commands if you want to use different values than those defined in variables.tf, otherwise it’ll use the defaults and show you a different plan than you expect.
Destroying infrastructure
When you no longer need the resources, you can destroy everything with a single command:
terraform destroy
Terraform shows what it’s about to destroy and asks for confirmation:
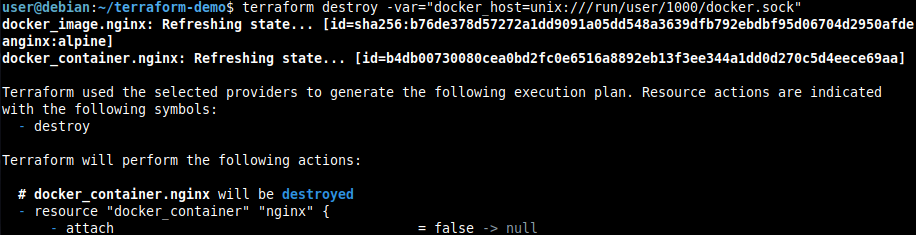
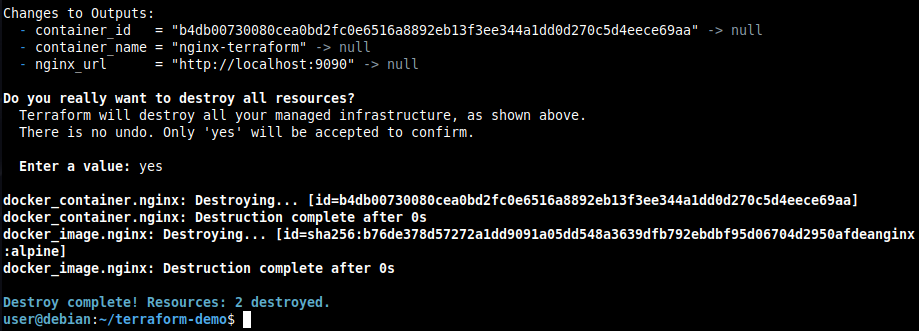
In my case, I need to include the docker_host variable since it’s different from the default value I set in variables.tf, so the provider knows which Docker socket to use. Otherwise, it won’t be able to interact with Docker or perform any action.
Structure of a more complex project
The example we’ve seen is fine to start understanding how Terraform works, but for larger projects it’s good to organize files in a more structured way.
There’s no single way to do it, but here’s an example structure:
my-project/
├── main.tf           # Main resources
├── variables.tf      # Variable definitions
├── prod.tfvars       # Variable values for production environment
├── dev.tfvars        # Variable values for development environment
├── outputs.tf        # Project outputs
├── providers.tf      # Provider configuration
└── modules/          # Reusable modules
    └── nginx/
        ├── main.tf
        ├── variables.tf
        └── outputs.tf
The prod.tfvars and dev.tfvars files are optional but very useful for managing different environments without having to use -var every time like we did in the Docker example.
In them you can define values specific to each environment, like credentials, resource names, particular configurations, etc. Remember not to commit these files if they contain sensitive information.
Their structure would be as follows:
# dev.tfvars
container_name = "nginx-dev"
external_port  = 8080
docker_host    = "unix:///run/user/1000/docker.sock"
And to use them, you pass the -var-file parameter when running terraform plan, terraform apply, or terraform destroy like this:
terraform apply -var-file="dev.tfvars"
Most common commands
| Command | Description |
|---|---|
terraform init |
Initialize the project and download providers |
terraform plan |
Show what changes will be applied |
terraform apply |
Apply the changes |
terraform show |
Show the current state of the infrastructure according to the .tfstate file |
terraform destroy |
Destroy all infrastructure |
terraform fmt |
Format the .tf files |
terraform validate |
Validate the configuration syntax |
terraform output |
Display the outputs |
terraform state list |
List the resources |
terraform state show <resource> |
Show details of a specific resource |
terraform state rm <resource> |
Remove a resource from .tfstate (without destroying it in actual infrastructure) |
terraform import <resource> <id> |
Import an existing resource (created manually) to .tfstate so Terraform manages it from then on |
terraform apply -refresh-only -auto-approve |
Update state with actual infrastructure, equivalent to the old terraform refresh |
Tips I wish I
- Version your code from the start.
.tffiles are code and deserve version control like any other. - But DON’T commit the state. Add
*.tfstate*to your.gitignoreor equivalent. This file can contain passwords, tokens, and other sensitive data you won’t want to expose. - Use variables for everything that might change. Don’t hardcode values that could be different tomorrow.
- Run
terraform fmtbefore committing. It formats the code automatically and saves you style headaches. - Always review the plan before doing
apply. It’s your last chance to see what will change before it actually does. - If you work in a team, remember to use a remote backend (S3, Blob Storage, etc.) to store the state file. Besides centralizing access, remote backends support state locking, which prevents two people from modifying the infrastructure at the same time and corrupting the file. If you work alone, the local file will be enough.
Conclusion
Terraform will completely change how you manage infrastructure. Instead of manual processes that are prone to errors, you have versioned, reviewable, and reproducible code.
My advice is to start with something small, like the Docker example we’ve seen, and scale up as you get comfortable.
If you want to practice with AWS services without spending a dime, check out my post about LocalStack where I explain how to set up this AWS emulator locally.