Network UPS Tools (NUT) is an open-source toolkit that lets us monitor and manage UPS (Uninterruptible Power Supply) devices. With NUT, we can automate safe shutdowns of our systems in case of power failure, protecting our data and hardware.
In this post, I’ll show you how to install and configure NUT on your server, set up clients to receive UPS status notifications, and implement Telegram notifications.
⚠️ DISCLAIMER: Please note that this article is a manual translation of the Spanish version. The screenshots may have been originally taken in Spanish, and some words/names may not match completely. If you find any errors, please report them to the author. ⚠️
Requirements
- A server with Debian (or derivative distributions) 64-bit.
- A UPS connected via USB to the server.
aptas the package manager on your system. If you use another distribution, you’ll need to adapt theaptcommands to your package manager.- Ability to run commands as
root(either asrootuser directly, or withsudoordoas). In my case, I’ll do it asroot(usingsu). - Check that your UPS is compatible with NUT in their hardware compatibility list. Note the recommended driver for your model as we will need it later.
- (Optional) A Telegram bot to receive notifications.
Things to keep in mind
-
NUT can operate in different modes:
standalone(for a single machine),netserver(to serve information to other machines), andnetclient(to receive information from a NUT server). -
Automatic shutdown configurations are critical. Make sure to test them in a controlled environment before implementing them in production.
-
Low battery values vary by UPS model. Adjust the parameters according to your device’s specifications.
Installing NUT
We start by installing NUT on our server. Open a terminal and run:
su -

apt install nut
During nut installation, the following packages will also be installed:
libnspr4,libnss3,libnutscan2,libupsclient6nut-client,nut-server
Additional packages will be suggested such as:
nut-monitor,nut-cgi,nut-i2c,nut-ipmi,nut-modbus,nut-snmp,nut-xml
Important: From this point on, it is assumed that we will be working as the root user. If you use sudo or doas, add the corresponding prefix to the commands.
Detecting the UPS
With NUT installed, connect your UPS via USB to the server and verify that the system detects it:
lsusb
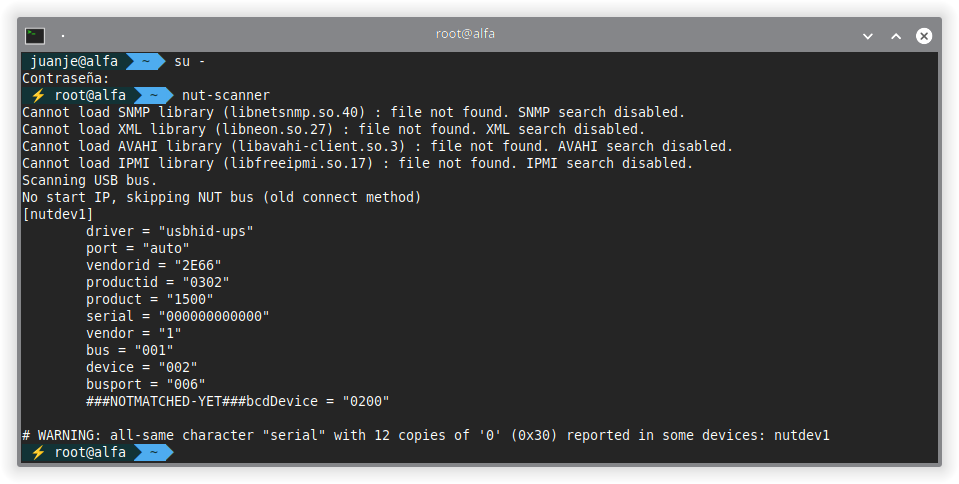
To get more detailed information about the UPS, use nut-scanner:
nut-scanner

# Or specifically for USB devices
nut-scanner -U
The output will show something like this:
Cannot load SNMP library (libnetsnmp.so.40) : file not found. SNMP search disabled.
Cannot load XML library (libneon.so.27) : file not found. XML search disabled.
Cannot load AVAHI library (libavahi-client.so.3) : file not found. AVAHI search disabled.
Cannot load IPMI library (libfreeipmi.so.17) : file not found. IPMI search disabled.
Scanning USB bus.
No start IP, skipping NUT bus (old connect method)
[nutdev1]
  driver = "usbhid-ups"
  port = "auto"
  vendorid = "2E66"
  productid = "0302"
  product = "1500"
  serial = "000000000000"
  vendor = "1"
  bus = "001"
  device = "004"
  busport = "002"
  ###NOTMATCHED-YET###bcdDevice = "0200"

# WARNING: all-same character "serial" with 12 copies of '0' (0x30) reported in some devices: nutdev1
Warnings about libraries not found are normal if you haven’t installed the corresponding optional packages.
Configuring the NUT server
Configure the UPS device
Edit the /etc/nut/ups.conf file to add your UPS configuration:
nano -cl /etc/nut/ups.conf
At the end of the file, add the UPS configuration using the data obtained earlier from nut-scanner:
[ups-homelab]
  driver = usbhid-ups
  port = auto
  vendorid = 2E66
  productid = 0302
  product = 1500
  vendor = 1
  bus = 001
  desc = "Salicru SPS 1500 Advanced T"
  ignorelb
  override.battery.charge.warning = 90
  override.battery.charge.low = 60
  override.battery.runtime.low = 60
Parameter explanation:
[ups-homelab]: Identifying name of the UPS in NUT.driver: Driver to use (usbhid-upsfor most USB UPSs).port: Connection port (autofor automatic detection).vendorid,productid,product,vendor,bus: USB device identifiers.desc: Human-readable device description.ignorelb: Ignore the default low battery signal from the UPS (we’ll use custom values).override.battery.charge.warning: Battery charge to issue warning (90%).override.battery.charge.low: Battery charge considered low (60%).override.battery.runtime.low: Remaining battery time considered low in seconds (60s).
Configure operation mode
Edit the /etc/nut/nut.conf file to configure the operation mode:
nano -cl /etc/nut/nut.conf
Change the MODE line to:
MODE=netserver
This will allow other machines on the network to query the UPS status.
Link to the nut.conf file documentation.
Configure the upsd service
Edit the /etc/nut/upsd.conf file to configure the address and port the service will listen on:
nano -cl /etc/nut/upsd.conf
Below the LISTEN directive examples, add:
LISTEN 0.0.0.0 3493
This will make upsd listen on all network interfaces on port 3493.
Link to the upsd.conf file documentation.
Configure administrative users
Edit the /etc/nut/upsd.users file to define users who can administer NUT:
nano -cl /etc/nut/upsd.users
Add two users: one with administrator permissions and another as an observer for clients:
[admin]
    password = ADMIN_PASSWORD_HERE
    actions = SET
    actions = FSD
    instcmds = all
    upsmon primary

[observer]
    password = OBSERVER_PASSWORD_HERE
    upsmon secondary
Important: Replace ADMIN_PASSWORD_HERE and OBSERVER_PASSWORD_HERE with secure passwords.
Parameter explanation:
password: User password.actions = SET: Allows modifying UPS variables.actions = FSD: Allows forcing shutdown (Forced ShutDown).instcmds = all: Allows executing all instant commands.upsmon primary: Primary user (manages the UPS directly).upsmon secondary: Secondary user (only monitors).
Link to the upsd.users file documentation.
Configure the upsmon monitor
Edit the /etc/nut/upsmon.conf file:
nano -cl /etc/nut/upsmon.conf
Under the MONITOR section, add the configuration to connect to our UPS:
# MONITOR <system> <powervalue> <username> <password> ("primary"|"secondary")
MONITOR ups-homelab@localhost 1 admin ADMIN_PASSWORD_HERE primary
Parameter explanation:
ups-homelab@localhost: UPS and server name (localhost because it’s on the same machine).1: Number of power supplies (1 for a single UPS).admin: NUT user to use.ADMIN_PASSWORD_HERE: User password.primary: This machine is the primary (manages the UPS directly).
Also modify the FINALDELAY value to configure the wait time before shutdown:
FINALDELAY 10
This will make the system shut down 10 seconds after receiving the low battery warning.
Link to the upsmon.conf file documentation.
Starting and verifying services
With the configuration complete, start NUT services:
systemctl start nut-server

systemctl status nut-server

systemctl start nut-monitor

systemctl status nut-monitor
If everything goes right, both services should be active and running.
Verify UPS status
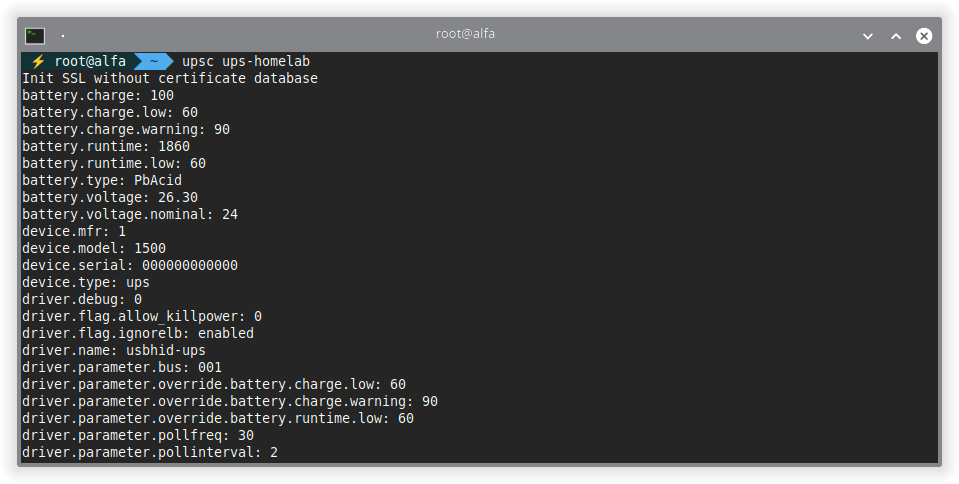
Check that our UPS is correctly configured:
upsc ups-homelab

# Alternatives:
# upsc ups-homelab@localhost
# upsc ups-homelab@<SERVER_IP>
The output will show detailed UPS information:
Init SSL without certificate database
battery.charge: 100
battery.charge.low: 70
battery.charge.warning: 95
battery.runtime: 1260
battery.runtime.low: 600
battery.type: PbAcid
battery.voltage: 27.50
battery.voltage.nominal: 24
device.mfr: 1
device.model: 1500
device.serial: 000000000000
device.type: ups
driver.name: usbhid-ups
input.frequency: 50.3
input.voltage: 228.4
input.voltage.nominal: 230
output.frequency: 50.4
output.voltage: 25.2
output.voltage.nominal: 24
ups.beeper.status: enabled
ups.load: 21
ups.status: OL
The ups.status: OL (OnLine) parameter indicates that the UPS is receiving power from the electrical grid.
Enable services at startup
If everything works correctly, enable the services to start automatically at boot:
systemctl enable nut-server

systemctl enable nut-monitor
Configuring NUT clients
If you have other machines on your network that should shut down when the UPS has low battery, set them up as NUT clients.
Installation on the client
On each client machine, install nut-client:
su -

apt update

apt install nut-client
For some reason, with the current version of NUT on Debian 13, installing nut-client does not install all the necessary files for its correct operation, so we will also install nut-server (but we will disable it immediately, we are only interested in the files it provides):
apt install nut-server

systemctl disable --now nut-server
Configure netclient mode
Edit /etc/nut/nut.conf on the client:
nano -cl /etc/nut/nut.conf
Configure the operation mode:
MODE=netclient
Link to the nut.conf file documentation.
Verify connectivity with the server
Before continuing, verify that the client can connect to the NUT server:
upsc ups-homelab@<SERVER_IP>
If the connection is successful, you’ll see the UPS information.
Configure monitoring on the client
Edit /etc/nut/upsmon.conf on the client:
nano -cl /etc/nut/upsmon.conf
Add the MONITOR line with the observer user data:
# MONITOR <system> <powervalue> <username> <password> ("primary"|"secondary")
MONITOR ups-homelab@<SERVER_IP> 1 observer OBSERVER_PASSWORD_HERE secondary
Save and exit the editor.
Link to the upsmon.conf file documentation.
Start service on the client
Restart the nut-client service:
systemctl restart nut-client

systemctl status nut-client
Test the configuration
To verify that the client receives events from the server, simulate a power loss by disconnecting the UPS from the electrical grid and monitor the logs:
journalctl -f -u nut-monitor
You should see messages like:
Sep 23 01:35:30 charlie nut-monitor[4665]: UPS ups-homelab@<SERVER_IP> on battery
Sep 23 01:35:30 charlie nut-monitor[5879]: Network UPS Tools upsmon 2.8.1
If it works correctly, enable and start the service:
systemctl enable --now nut-client
Shuting down clients automatically on power loss
To maximize available battery time, we can configure clients to begin the shutdown process as soon as the UPS goes on battery (ONBATT). Later, we could turn them back on using Wake-on-LAN or manually.
Configure notifications on the client
Edit /etc/nut/upsmon.conf on the client:
nano -cl /etc/nut/upsmon.conf
Add the configuration to execute upssched:
NOTIFYCMD /usr/sbin/upssched

NOTIFYFLAG ONBATT EXEC
Link to the upsmon.conf file documentation.
Configure upssched
Edit /etc/nut/upssched.conf:
nano -cl /etc/nut/upssched.conf
Add the following lines:
CMDSCRIPT /usr/bin/upssched-cmd

PIPEFN /run/nut/upssched/upssched.pipe

LOCKFN /run/nut/upssched/upssched.lock

# Execute shutdown as soon as UPS goes on battery
AT ONBATT * EXECUTE shutdown_onbatt
Link to the upssched.conf file documentation.
Configure sudo permissions for the nut user
Install sudo if you don’t have it:
apt update

apt install sudo
Edit the sudoers configuration:
visudo
Add at the end of the file:
# Allow nut user to execute shutdown command without password
nut ALL=(ALL) NOPASSWD: /sbin/shutdown
Create shutdown script
Edit or create the /usr/bin/upssched-cmd script:
nano -cl /usr/bin/upssched-cmd
Fill it with the following content:
#!/usr/bin/env bash
case "$1" in
  shutdown_onbatt)
    logger -t nut-monitor "Received ONBATT from server: shutting down"
    sudo /sbin/shutdown -h now
    ;;
  *)
    logger -t nut-monitor "upssched-cmd: unknown argument: $1"
    ;;
esac
Make the script executable:
chmod +x /usr/bin/upssched-cmd
Restart service and test
Restart the service:
systemctl restart nut-client

systemctl status nut-client
To test that it works, you can manually execute:
/usr/bin/upssched-cmd shutdown_onbatt
Warning: This command will shut down the system immediately.
Bonus: Telegram notifications
We can configure NUT to send UPS status notifications via Telegram.
Requirements
- Your Telegram account ID.
- A Telegram bot token.
Configure upssched on the server
Edit /etc/nut/upsmon.conf on the server:
nano -cl /etc/nut/upsmon.conf
Configure notifications:
NOTIFYCMD /usr/sbin/upssched

NOTIFYFLAG ONLINE   SYSLOG+WALL+EXEC
NOTIFYFLAG ONBATT   SYSLOG+WALL+EXEC
NOTIFYFLAG LOWBATT  SYSLOG+WALL+EXEC
NOTIFYFLAG FSD      SYSLOG+WALL+EXEC
NOTIFYFLAG COMMOK   SYSLOG+WALL+EXEC
NOTIFYFLAG COMMBAD  SYSLOG+WALL+EXEC
NOTIFYFLAG SHUTDOWN SYSLOG+WALL+EXEC
NOTIFYFLAG REPLBATT SYSLOG+WALL
NOTIFYFLAG NOCOMM   SYSLOG+WALL+EXEC
Link to the upsmon.conf file documentation.
Configure the events in upssched
Edit /etc/nut/upssched.conf:
nano -cl /etc/nut/upssched.conf
Add the following lines:
CMDSCRIPT /usr/bin/upssched-cmd

PIPEFN /run/nut/upssched/upssched.pipe

LOCKFN /run/nut/upssched/upssched.lock

# Direct events
AT ONLINE   * EXECUTE ONLINE
AT ONBATT   * EXECUTE ONBATT
AT LOWBATT  * EXECUTE LOWBATT
AT FSD      * EXECUTE FSD
AT COMMOK   * EXECUTE COMMOK
AT COMMBAD  * EXECUTE COMMBAD
AT SHUTDOWN * EXECUTE SHUTDOWN
AT REPLBATT * EXECUTE REPLBATT
AT NOCOMM   * EXECUTE NOCOMM
Link to the upssched.conf file documentation.
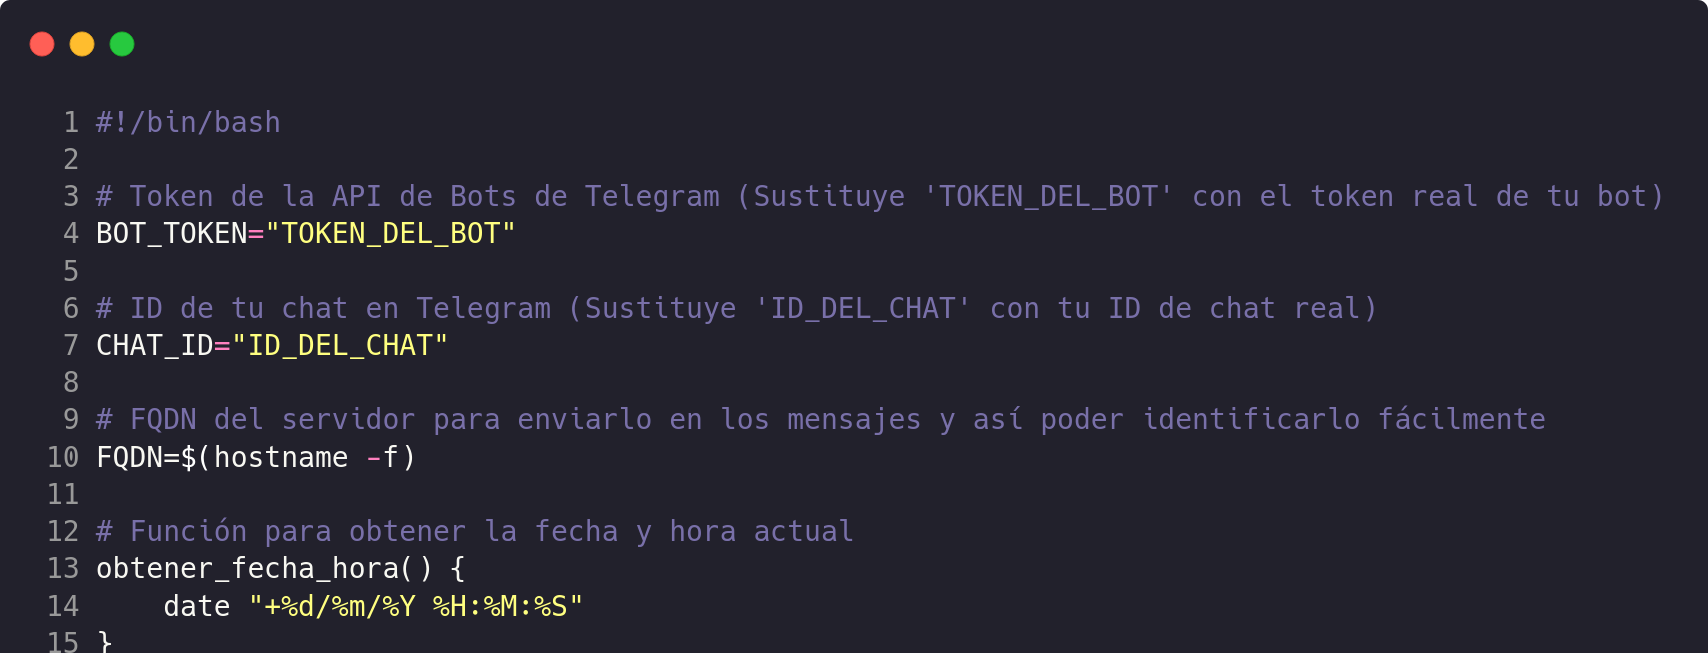
Create script with Telegram notifications
Edit again the /usr/bin/upssched-cmd file on the server:
nano -cl /usr/bin/upssched-cmd
Replace its content with:
#!/usr/bin/env bash
ACTION="$1"
UPS="ups-homelab@localhost"
STATEFILE="/var/lib/nut/last_batt_notify"
PIDFILE="/var/lib/nut/checkbatt.pid"

BOT_TOKEN="<YOUR_BOT_TOKEN>"
CHAT_ID="<YOUR_CHAT_ID>"

INTERVAL=30

send_msg() {
  local text="$1"
  if [[ -n "$BOT_TOKEN" && -n "$CHAT_ID" ]]; then
    curl -s -X POST "https://api.telegram.org/bot${BOT_TOKEN}/sendMessage" \
         -d chat_id="${CHAT_ID}" \
         --data-urlencode "text=${text}" >/dev/null || true
  fi
}

# Collect UPS information
get_status_info() {
  CHARGE="$(upsc "$UPS" battery.charge 2>/dev/null || echo "N/A")"
  STATUS="$(upsc "$UPS" ups.status 2>/dev/null || echo "N/A")"
  RUNTIME="$(upsc "$UPS" battery.runtime 2>/dev/null || echo "")"

  EXTRA=""
  if [[ "$RUNTIME" =~ ^[0-9]+$ ]]; then
    MIN_LEFT=$(( RUNTIME / 60 ))
    EXTRA=" (~${MIN_LEFT} min left)"
  fi
}

# Periodic battery monitoring
check_loop() {
  while true; do
    get_status_info
    CHARGE_INT="${CHARGE%.*}"
    LAST="$(cat "$STATEFILE" 2>/dev/null || echo 999)"

    if [[ "$CHARGE_INT" != "$LAST" && "$CHARGE" != "N/A" ]]; then
      echo "$CHARGE_INT" > "$STATEFILE"
      send_msg "🔋 Battery: ${CHARGE}%${EXTRA}
Status: ${STATUS}"
    fi

    # Exit if UPS is back online
    if [[ "$STATUS" == *"OL"* ]]; then
      exit 0
    fi

    sleep "$INTERVAL"
  done
}

case "$ACTION" in
  ONBATT)
    get_status_info
    send_msg "⚡ Running on battery!
Battery: ${CHARGE}%${EXTRA}
Status: ${STATUS}"

    # Start background monitoring
    if [[ ! -f "$PIDFILE" ]] || ! kill -0 "$(cat "$PIDFILE" 2>/dev/null)" 2>/dev/null; then
      check_loop & echo $! > "$PIDFILE"
    fi
    ;;
  ONLINE)
    get_status_info
    send_msg "🔌 Power restored!
Battery: ${CHARGE}%${EXTRA}
Status: ${STATUS}"

    # Stop monitoring
    if [[ -f "$PIDFILE" ]]; then
      kill "$(cat "$PIDFILE")" 2>/dev/null || true
      rm -f "$PIDFILE"
    fi
    ;;
  LOWBATT)
    get_status_info
    send_msg "❗ Battery low! System may shut down soon.
Battery: ${CHARGE}%${EXTRA}
Status: ${STATUS}"
    ;;
  FSD)
    get_status_info
    send_msg "💀 Forced shutdown triggered.
Battery: ${CHARGE}%${EXTRA}
Status: ${STATUS}"
    ;;
  COMMOK)
    get_status_info
    send_msg "📡 UPS communication restored.
Battery: ${CHARGE}%${EXTRA}
Status: ${STATUS}"
    ;;
  COMMBAD)
    get_status_info
    send_msg "🚫 Lost communication with UPS!
Battery: ${CHARGE}%${EXTRA}
Status: ${STATUS}"
    ;;
  SHUTDOWN)
    get_status_info
    send_msg "🛑 System shutdown initiated.
Battery: ${CHARGE}%${EXTRA}
Status: ${STATUS}"
    ;;
  REPLBATT)
    get_status_info
    send_msg "🔧 UPS battery needs replacement!
Battery: ${CHARGE}%${EXTRA}
Status: ${STATUS}"
    ;;
  NOCOMM)
    get_status_info
    send_msg "❌ No communication with UPS.
Battery: ${CHARGE}%${EXTRA}
Status: ${STATUS}"

    # Stop monitoring if active
    if [[ -f "$PIDFILE" ]]; then
      kill "$(cat "$PIDFILE")" 2>/dev/null || true
      rm -f "$PIDFILE"
    fi
    ;;
  *)
    send_msg "⚠️ Unknown UPS event: ${ACTION}"
    ;;
esac
Important: Replace <YOUR_BOT_TOKEN> and <YOUR_CHAT_ID> with your Telegram credentials.
Make the script executable:
chmod +x /usr/bin/upssched-cmd
Restart services
Restart all NUT services:
systemctl restart nut-server

systemctl restart nut-monitor

systemctl restart nut-client
And if you want to check their status:
systemctl status nut-server

systemctl status nut-monitor

systemctl status nut-client
Test notifications
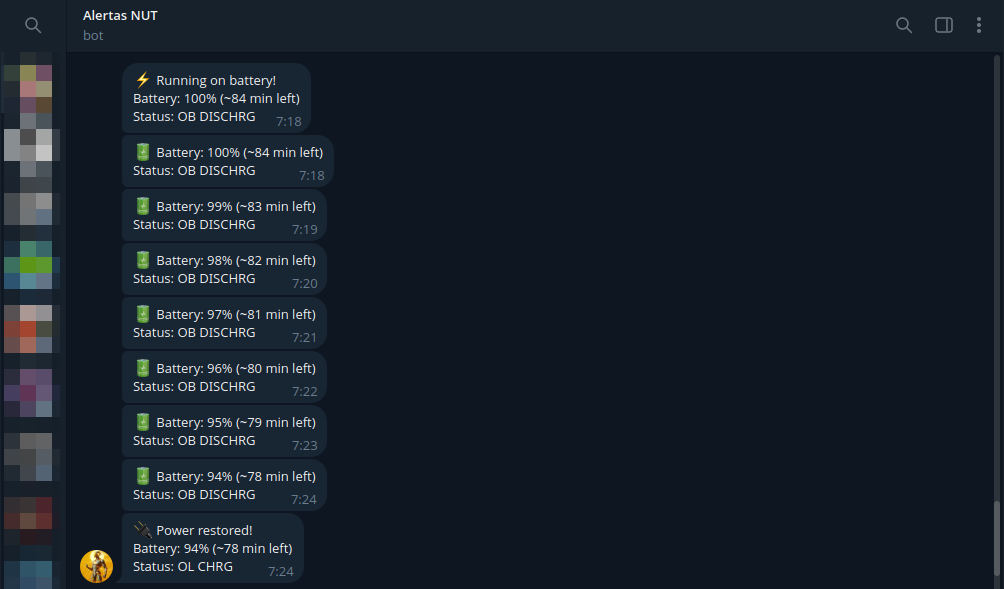
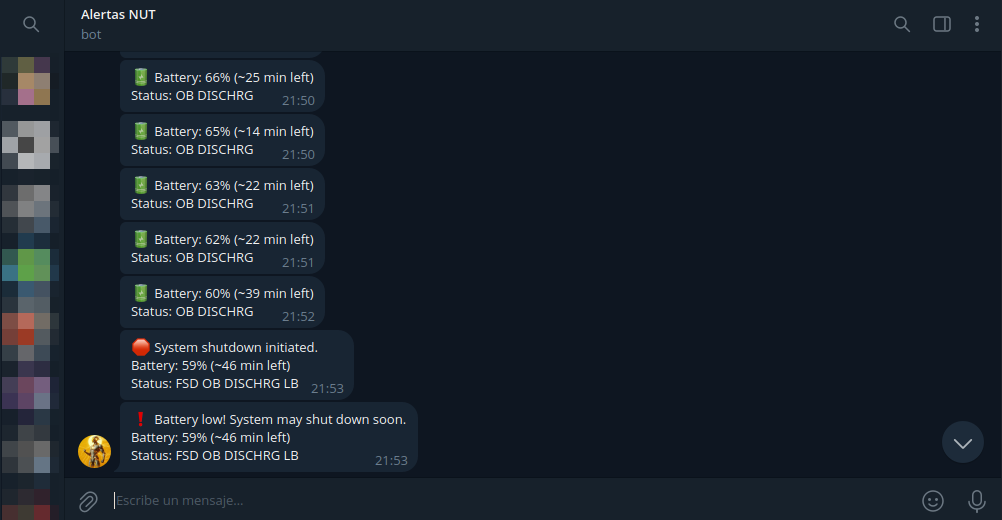
To test that notifications work, just unplug the UPS from the electrical grid.
You should receive a message on Telegram indicating that the UPS is running on battery, and while the server is running, you will receive updates on the battery status. Similarly, when power is restored or the system finally shuts down, you will receive the corresponding notifications:
Conclusion
With NUT properly configured, your systems are protected against power failures. The server manages automatic shutdown of multiple clients (and itself), and Telegram notifications keep you updated on the UPS status in real-time.
Web interface to monitor your UPS
If you want a graphical interface to monitor your UPS, take a look at the post about PeaNUT, a web interface for NUT that allows you to see all relevant information at a glance.
Important notes
- Always test the automatic shutdown configuration in a controlled environment before implementing it in production.
- Adjust low battery values according to your UPS specifications and needs.
- The periodic battery monitoring timer in the Telegram script may not work exactly as specified (it runs every 30 seconds regardless of the configured value).